Tampilkan postingan dengan label WINDOWS TRIK. Tampilkan semua postingan
0

FREE Download Windows 8

Jumat, 11 November 2011

Microsoft demoed their upcoming Windows 8 OS during the BUILD conference today along with the sneak peek to developers platform and tools. Windows 8 includes plethora of new features which includes the all new immersive Metro style UI, Internet Explorer 10 (IE10), Task Manager, Quick boot, Face password, Cloud integration etc. They also made available the Windows 8 Developer Preview copy to all the attendees out there along with a Samsung Tablet so that the developer community can play with it and give feedback before the RTM hits store. And for the rest of us the very same files will be uploaded to their public servers and will be available soon.

Features
� M3 user interface for installation/configuration
� Microsoft's Hyper-V virtualization tool
� OEM Activation 3.0
� Windows 8 Aero Glass or Lite theme
� Instant M2 and M3 wallpaper/logon screen customization
� Metro style UI, Internet Explorer 10 (IE10), Task Manager, Quick boot, Face password, Cloud integration etc.


Mediafire Password = MediafireRocks.Com
0

Mempercepar Koneksi Internet dengan Setting DNS

Kamis, 17 Februari 2011
DNS kepanjangan Domain Name Server. Fungsi DNS menerjemahkan nama Domain menjadi deretan angka IP. Contohnya bila kita akan membuka atau merequest url Domain tertentu, biasanya kita menggunakan deretan nama atau huruf karena lebih mudah dihafal seperti google.com , yahoo.com , Facebook.com dan sebagainya.
Nah disinilah DNS ini bekerja. DNS ini melakukan encode atau menerjemahkan dari domain google.com ke dalam bentuk deretan angka unik yaitu berupa IP misal google.com Ip nya adalah 208.67.219.231. Jadi bila kita masukan 208.67.219.231 pada browser maka juga akan membuka domain google.com tersebut. Deretan angka IP seperti 174.36.138.32. IP inilah yang digunakan mesin internet untuk saling berkomunikasi seperti Server Domain, Server Hosting, Server Proxy dan sebagainya.
Terus apa hubungan DNS dengan kecepatan akses internet kita ?
Pada dasarnya semua ISP (Internet Service Provider) atau penyedia layanan sambungan internet seperti indosat, Telkomsel, Telkom, dan sebagainya menggunakan atau mempunyai DNS Server tersendiri.Server DNS suatu ISP atau penyedia internet tentunya juga mempunyai kemampuan, kecepatan, speseifikasi, dan lama cache tersediri.
Adakalanya Server DNS ini Drop karena padatnya Trafik DNS server suatu ISP. Sehingga menyebabkan lambannya query atau proses request. Jadi bila terjadi gangguan pada Server DNS suatu ISP, maka pada saat kita akan membuka website menggunakan browser seperti mozila , Firefox, Opera, Flock, safari dan sebagainya, maka akan terasa lebih lambat bahkan terjadi konfirmasi error atau not Found pada browser kita. Seperti yang dulu sering terjadi di Telkom Speedy beberapa saat lalu.
Meski ISP atau penyedia Internet yang kita gunakan mempunyai Server DNS sendiri sebenarnya kita juga bisa menggunakan atau memanfaatkan DNS server ISP operator lain. Jadi Server DNS ini bisa kita gunakan untuk semua jenis ISP yang kita gunakan.
Berikut ini langkah atau Cara merubah Setting DNS pada windows :
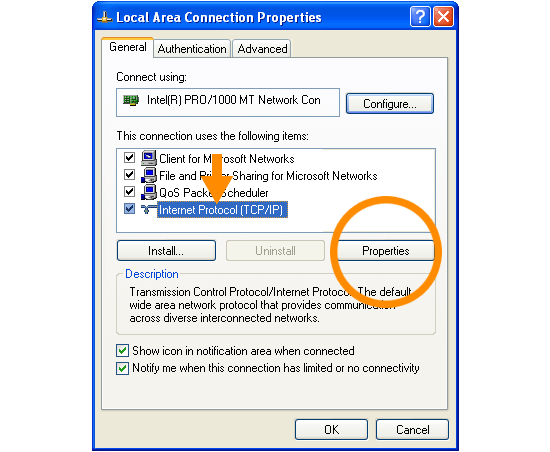
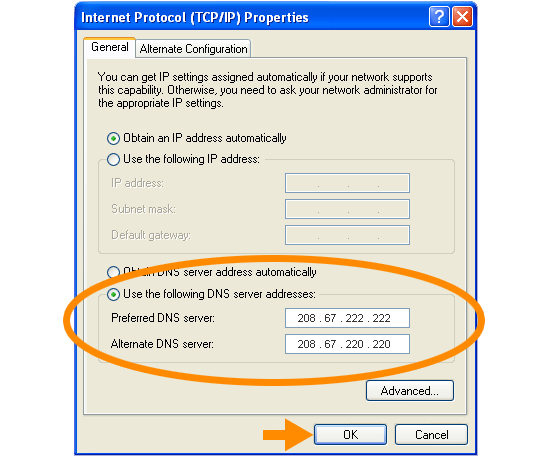
Control panel >>> Network Connections >>> Klik kanan account sambungan internet yang sedang aktif /connected >>> Properties >>> Networking >>> Internet Protocol >>> Properties >> Beri Tanda pada Use the Following DNS server addresses >>> masukan DNS yang anda pilih >> Klik Ok
Cara setting DNS  pada windows
Mempercepat Akses  Internet Menggunakan DNS alternatif
Mempercepat Akses Internet Menggunakan DNS alternatif
Restart Ulang Koneksi Internet anda , Perubahan akan terjadi setelah anda restart ulang koneksi internet anda.
Silahkan pilih alternatif DNS Server berikut ini, gunakan DNS yang anda rasa paling cepat pada sambungan internet anda.
Daftar DNS Server Indonesia :
Server DNS indosat.net.id termasuk DNS Indosat IM2
  • 202.155.0.10
  • 202.155.0.15
  • 202.155.0.20
  • 202.155.0.25
  • 202.155.46.66
  • 202.155.46.77
  • 202.155.30.227
DNS Telkom.net.id Telkom Speedy
  • 202.134.2.5
  • 203.130.196.5
  • 202.134.0.155
  • 202.134.1.10
  • 202.134.0.62
  • 202.159.32.2
  • 202.159.33.2
  • 202.155.30.227
DNS AWARI (Asosiasi Warnet Indonesia)
  • 203.34.118.10
  • 203.34.118.12
DNS sat.net.id
  • 202.149.82.25
  • 202.149.82.29
DNS cbn.net.id
  • 202.158.40.1
  • 202.158.20.1
  • 202.158.3.7
  • 202.158.3.6
Singnet Singapore
  • 165.21.100.88
  • 165.21.83.88
DNS indo.net.id
  • 202.159.32.2
  • 202.159.33.2
DNS itb.ac.id
  • 202.249.24.65
  • 167.205.23.1
  • 167.205.22.123
  • 167.205.30.114
DNS ukdw.ac.id
  • 222.124.22.18
Daftar DNS Luar indonesia :
DNS Open DNS
  • 208.67.222.222
  • 208.67.220.220
DNS ScrubIt
  • 67.138.54.100
  • 207.225.209.66
DNS DNSadvantage
  • 156.154.70.1
  • 156.154.71.1
DNS vnsc-pri.sys.gtei.net
  • 4.2.2.1
  • 4.2.2.2
  • 4.2.2.3
  • 4.2.2.4
  • 4.2.2.5
  • 4.2.2.6
Verizon (Reston, VA, US)
  • 151.197.0.38
  • 151.197.0.39
  • 151.202.0.84
  • 151.202.0.85
  • 151.202.0.85
  • 151.203.0.84
  • 151.203.0.85
  • 199.45.32.37
  • 199.45.32.38
  • 199.45.32.40
  • 199.45.32.43
GTE (Irving, TX, US)
  • 192.76.85.133
  • 206.124.64.1
One Connect IP (Albuquerque, NM, US)
  • 67.138.54.100
OpenDNS (San Francisco, CA, US)
  • 208.67.222.222
  • 208.67.220.220
Exetel (Sydney, AU)
  • 220.233.167.31
VRx Network Services (New York, NY, US)
  • 199.166.31.3
SpeakEasy (Seattle, WA, US)
  • 66.93.87.2
  • 216.231.41.2
  • 216.254.95.2
  • 64.81.45.2
  • 64.81.111.2
  • 64.81.127.2
  • 64.81.79.2
  • 64.81.159.2
  • 66.92.64.2
  • 66.92.224.2
  • 66.92.159.2
  • 64.81.79.2
  • 64.81.159.2
  • 64.81.127.2
  • 64.81.45.2
  • 216.27.175.2
  • 66.92.159.266.93.87.2
Sprintlink (Overland Park, KS, US)
  • 199.2.252.10
  • 204.97.212.10
  • 204.117.214.10
Cisco (San Jose, CA, US)
  • 64.102.255.44
  • 128.107.241.185
Catatan :
Beberapa DNS tidak bisa digunakan untuk akses FTP dan Website tertentu diblokir oleh Server DNS tersebut..
sumber : http://www.esc-creation.com/
0

Tutorial Cara Membuat Task Manager dangan NOTEPAD

 Gag usah lama-lama lagi langsung aja praktek lah�
Langsung aja copast script dibawah ini di Notepad.

@echo off
mode 33,25
setlocal ENABLEDELAYEDEXPANSION
Title Process Manager
:Begin
PUSHD
CD /D "!TEMP!"
set "TASKLIST=%windir%\system32\tasklist.exe"
set "FIND=%windir%\system32\find.exe"
set "wmic=%windir%\System32\Wbem\wmic.exe"
set "Explore=%windir%\explorer.exe"

:Reload
cls
set num=0
echo.________________________________
echo.[ BLACKRAS DETECTOR ] [ PID ]
echo.--------------------------------
if not defined NAME set NAME=%USERNAME%
!TASKLIST! /FI "USERNAME eq !NAME!" /FO TABLE /NH >"plist.txt"
for /f "tokens=*" %%a in (plist.txt) do (
set /a num+=1
set "list=%%a"
set "list=!list:~0,32!"
echo.!list!
)
echo.________________________________
Del /f /q "plist.txt" >nul 2>&1
Title !NAME! - [!num!] Process Running.
if not defined ac (
if /i "!NAME!"=="%USERNAME%" goto :USR
if /i "!NAME!"=="SYSTEM" goto :SYS
)
if /i "!ac!"=="K" goto :Kill
if /i "!ac!"=="S" goto :SYSTEM
if /i "!ac!"=="U" goto :USER
if /i "!ac!"=="E" goto :Explore
set "ac="
GOTO :Reload

:USER
set "NAME="
set "ac="
GOTO :Reload
:USR
echo.CH : K=Kill, S=System, E=Explore
set /p "ac=Manage : "
GOTO :Reload

:SYSTEM
set NAME=SYSTEM
set "ac="
GOTO :Reload
:SYS
echo.CH : K=Kill, U=User, E=Explore
set /p "ac=Manage : "
GOTO :Reload

:Kill
echo.Type PID to Kill..
set /p "PID=PID : "
if not defined PID goto :Reload
Taskkill /F /PID !PID! >nul 2>&1
if errorlevel 1 (echo.No Task Running w/ this PID.) else (
if !PID! geq 0 if !PID! lss 10 (
echo.Can't kill Critical Process
goto :clr_var2
) else (
echo.Success : Task with PID=!PID!
echo. has been KILLED..
))
:clr_var2
set "ac="
set "PID="
PAUSE>NUL
GOTO :Reload

:Explore
echo.Type PID to Explore..
set /p "PID=PID : "
if not defined PID goto :Reload
if !PID! lss 10 goto :clr_var
if !PID! gtr 10000 goto :clr_var
!wmic! process get ProcessID,ExecutablePath >"path.txt"
for /f "tokens=1,2 delims= " %%a in ('type "path.txt" ^| !FIND! " !PID! "') do (
set "exepath=%%~dpa"
)
if not defined exepath (
echo.No Task Running w/ this PID.
PAUSE>NUL
) else (!Explore! "!exepath!")
set "ac="
:clr_var
set "PID="
set "exepath="
Del /f /q "path.txt" >nul 2>&1
GOTO :Reload

:END
__________

Kemudian Simpan dengan ekstensi .bat
Dan ini tampilannya

kid zoom pic
0

Tutorial Optimasi Mozilla Firefox Paling Gokil

optimasi Tuneup Mozilla Firefox


Postingan ini membahas tentang masalah klasik pagi teman-teman yang biasa browsing di warnet yang walaupun sepi user tapi buat browsing ttp LEMOT ABIS, download juga pelan bgt... itu karena tiap bilik/room udah di batasi bitrate n bandwithnya... nah sekarang masalah itu mungkin bisa teratasi dengan cara melakukan Tuneup pada Mozilla Firefox, ini cara-caranya:

1). Buka Browser Mozilla Firefox
2). Pada Address Bar Ketik : about:CONFIG
3). Cari string di bawah ini : ( pastikan semua srting dibawah "TRUE")
contoh menggantingnya :
NETWORK.HTTP.PIPELINING FALSE ==> klik kanan dan pilih "Toggle"
NETWORK.HTTP.PIPELINING TRUE

NETWORK.HTTP.PIPELINING.MAXREQUESTS 64
NETWORK.HTTP.PROXY.PIPELINING TRUE
NETWORK.PROXY.SHARE_PROXY_SETTINGS FALSE <=== ini harus False 4). buat srting baru caranya : Klik Kiri 1X Dimana Saja, Klik Kanan [/b]NEW>>INTEGER[/b]
5). Ketik : NGLAYOUT.INITIALPAINT.DELAY Beri Nilai 0
6). Kemudian REFRESH atau Tekan F5
7). Pada Address Bar Ketik : about:BLANK
Klik Menu:
Untuk OS Windows XP TOOLS>>OPTIONS>>WEB FEATURES
Untuk OS Linux ( Vector ) EDIT >> PREFERENCES
Untuk Setting yang berbeda di beberapa OS EDIT >>ADVANCED
9). Pada Option :
ALLOW WEB SITES TO INSTALL SOFTWARE Beri Tanda Check Box Untuk mengaktifkan
10).Kemudian Tekan OK Lalu REFRESH ( F5 )
11).Masuk Ke Link Ini :
https://addons.mozilla.org/en-US/firefox/addon/125?applicationfiltered=firefox&id=125
12).Download Software SwitchProxy Tool Versi 1.3.4
13).Setelah Selesai Jangan Tekan Tombol UPDATE
14).Klik Tanda X (tutup)Yang Ada Di Pojok Kanan Atas Dari POP UP Window Yang Muncul
15).Tutup Semua Browser Mozilla FireFox,
16).Kemudian Buka Lagi Untuk Mengaktifkan Software SwitchProxy Tool Versi 1.3.4 Yang sudah di Install Tadi
17).Kalo Instalasi Sukses, Akan Muncul Toolbar tambahan Di Bawah Toolbar Navigasi & Address Bar.
Sekarang Browser Mozilla Siap Untuk Digunakan��.
:: Message ::
-- Software SwitchProxy Tool Versi 1.3.4 Ini selain untuk Mengganti Proxy Secara Otomatis Di Browser Mozilla FireFox, Engine-nya Juga Berpengaruh terhadap Kecepatan Koneksi Internet
-- Cara Ini Sangat Efektif Bila Digunakan Di Warnet Yang Padat Pengunjung untuk Menyedot Bandwidth ( Mayoritas kecepatan akses Internet ) Ke Komputer Yang Sedang Anda Pakai
-- Perubahan Yang Signifikan Terjadi Pada koneksi Internet Dengan BROADBAND / VSAT

Klik 2x di settingan dan masukin angka-angka ini - untuk true / false booleans � mereka bakal ganti otomatis begitu klik 2x
Code:
browser.tabs.showSingleWindowModePrefs � true
network.http.max-connections � 64
network.http.max-connections-per-server � 20
network.http.max-persistent-connections-per-proxy � 10
network.http.max-persistent-connections-per-server � 4
network.http.pipelining � true
network.http.pipelining.maxrequests � 100
network.http.proxy.pipelining � true
network.http.request.timeout � 300
network.http.request.max-start-delay = 0
nglayout.initialpaint.delay = 0
If nglayout.initialpaint.delay doesnt exist, Right click, new integer.

Optional:
Code:
network.http.max-persistent-connections-per-proxy = 10
network.http.proxy.pipelining = true
network.http.proxy.version = 1.0

Tutup mozilla trus jalanin lagi.
Sekarang Mozilla lo mengGILAA KUENCEENGNYA!!.
Peringatan:
Settingan ini bikin lo ngedonDot (ngedownload maksudnya hee) situs dengan amat KESURUPAN, BUT bikin Overload luar biasa ke situs yang lo tuju!
Ga bermaksud apa-apa selain kompi lain yang dapat share internet bakal lemod ABEZZZ gara-gara lo sedot benwidnya!

Next tip:
Disable IPv6 di Firefox buat bikin sejuk kecepatan load page lo!!........ soalnya hamper semua site dah ga make IPv4...........

Buka Firefox.........ketik �about:config� (enter)
cari :Network.dns.disableIPv6

Klik 2x buat ngerubah jadi 'true' trus restart Firefox.
Lo bakal mempercepat akses browsing.........page per page.
Sekarang Firefox bener-bener dah KUENCEEENGG buat lo!...
nglayout.initialpaint.delay bisa dirubah yg mana aja...bisa 0 bisa 300 ada juga yg set 30...tergantung kebutuhan.....coba 0 dulu...baru nanti kl ga ada perubahan naikan ke 300 atau nilai yg dirasa memuaskan

For ADSL:
Code:
1. Type: about:config
2. Set:
network.http.max-connections : 64
network.http.max-connections-per-server : 21
network.http.max-persistent-connections-per-server : 8
network.http.pipelining : true
network.http.pipelining.maxrequests : 100
network.http.proxy.pipelining : true
3. Lastly right-click anywhere and select New-> Integer. Name it "nglayout.initialpaint.delay" and set its value to "0". This value is the amount of time the browser waits before it acts on information it recieves. (Copy from TvM)[/code]

For Dial_ip:
Code:
browser.cache.disk_cache_ssl : true
browser.xul.error_pages.enabled : true
content.interrupt.parsing : true
content.max.tokenizing.time : 3000000
content.maxtextrun : 8191
content.notify.backoffcount : 5
content.notify.interval : 750000
content.notify.ontimer : true
content.switch.threshold : 750000
network.http.max-connections : 32
network.http.max-connections-per-server : 8
network.http.max-persistent-connections-per-proxy : 8
network.http.max-persistent-connections-per-server : 4
network.http.pipelining : true
network.http.pipelining.maxrequests : 8
network.http.proxy.pipelining : true
nglayout.initialpaint.delay : 750
plugin.expose_full_path : true
signed.applets.codebase_principal_support : true

tambahan setting : bisa di sesuaikan dengan spesifikasi komputer:
1. di address bar ketik about:config

Pake settingan ini (konfigurasi normal atawa general):
Code:
network.http.pipelining, true
network.http.proxy.pipelining, true
network.http.pipelining.maxrequests, 8
content.notify.backoffcount, 5
plugin.expose_full_path, true
ui.submenuDelay, 0


Kalo kompie loe termasuk kompie yang cepat..dan koneksi internet loe termasuk koneksi yang cepat pake settingan dibawah ini
Code:
content.interrupt.parsing, true
content.max.tokenizing.time, 2250000
content.notify.interval, 750000
content.notify.ontimer, true
content.switch.threshold, 750000
nglayout.initialpaint.delay, 0
network.http.max-connections, 48
network.http.max-connections-per-server, 16
network.http.max-persistent-connections-per-proxy, 16
network.http.max-persistent-connections-per-server, 8
browser.cache.memory.capacity, 65536
Pake settingan ini kalo kompie loe termasuk kompie yang cepat, tetapi akses internetnya lemot
Code:
content.max.tokenizing.time, 2250000
content.notify.interval, 750000
content.notify.ontimer, true
content.switch.threshold, 750000
network.http.max-connections, 48
network.http.max-connections-per-server, 16
network.http.max-persistent-connections-per-proxy, 16
network.http.max-persistent-connections-per-server, 8
nglayout.initialpaint.delay, 0
browser.cache.memory.capacity, 65536

Pake settingan ini kalo kompie loe kompi yang cepat..tapi akses internetnya lemot (sama kayak di atas pilih aja salah satu)
Code:
browser.xul.error_pages.enabled, true
content.interrupt.parsing, true
content.max.tokenizing.time, 3000000
content.maxtextrun, 8191
content.notify.interval, 750000
content.notify.ontimer, true
content.switch.threshold, 750000
network.http.max-connections, 32
network.http.max-connections-per-server, 8
network.http.max-persistent-connections-per-proxy, 8
network.http.max-persistent-connections-per-server, 4
nglayout.initialpaint.delay, 0
browser.cache.memory.capacity, 65536

Pake settingan ini kalo kompie loe yang lemot,tapi akses internet loe cepat
Code:
content.max.tokenizing.time, 3000000
content.notify.backoffcount, 5
content.notify.interval, 1000000
content.notify.ontimer, true
content.switch.threshold, 1000000
content.maxtextrun, 4095
nglayout.initialpaint.delay, 1000
network.http.max-connections, 48
network.http.max-connections-per-server, 16
network.http.max-persistent-connections-per-proxy, 16
network.http.max-persistent-connections-per-server, 8
dom.disable_window_status_change, true

Pake setingan ini kalo kompie loe lemot..dan akses internetnya juga lemot
Code:
content.max.tokenizing.time, 2250000
content.notify.interval, 750000
content.notify.ontimer, true
content.switch.threshold, 750000
nglayout.initialpaint.delay, 750
network.http.max-connections, 32
network.http.max-connections-per-server, 8
network.http.max-persistent-connections-per-proxy, 4
dom.disable_window_status_change, true.

silakan tune up browser kesayangan anda.
0

Free Download Antivirus For WINDOWS 7

Berikut ini beberapa Free antivirus yang support dengan Windows 7

Avast Free Antivirus

[ Download ]
Free Antivirus for Windows 7
  • Antivirus and anti-spyware engine
  • avast! Intelligent Scanner
  • Silent/Gaming Mode
  • Behavior Shield
  • Real time anti-rootkit protection
  • Smart virus updates
  • avast! Community IQ
  • Behavioral Honeypots
  • Green computing
  • avast! iTrack
  • File System / Mail Shield
  • Web Shield
  • IM / P2P Shield
  • Network Shield
  • Compatible with Windows XP, Vista and 7

Avira AntiVir Personal � FREE Antivirus

[ Download ]
Free Antivirus for Windows 7
Avira AntiVir Personal � FREE Antivirus is a reliable free antivirus solution, that constantly and rapidly scans your computer for malicious programs such as viruses, Trojans, backdoor programs, hoaxes, worms, dialers etc. Monitors every action executed by the user or the operating system and reacts promptly when a malicious program is detected. Avira AntiVir Personal is a comprehensive, easy to use antivirus program, designed to offer reliable free of charge virus protection to home-users, for personal use only, and is not for business or commercial use. Available for Windows or UNIX.

AVG Anti-Virus Free Edition 9.0

[ Download ]
Free Antivirus for Windows 7
It�s always been our philosophy at AVG that everyone has the right to basic computer security at no charge. And our 110 million think we�re doing a pretty good job. So if you�re planning to spend time online and you regularly exchange files with friends, check us out.
  • Surf, and search with confidence, while LinkScanner� keeps you safe from harmful sites
  • Get online and offline protection from viruses, spyware, and other nasties
  • Enjoy consistently high-speed PC performance with our new enhanced virus scanner
  • Automatic updates keep your protection current
  • Compatible with Windows 7, Windows Vista, Windows XP and Windows 2000
..

Comodo Firewall and AntiVirus

[ Download ]
Free Antivirus for Windows 7
free Firewall and AntiVirus to take the first step in protecting your PC from malware, viruses, worms, and more.
Comodo Internet Security 4.0 includes a built-in sandbox which combines file system/registry virtualization and least-privileged user account principle in order to combat unknown malware.
During the setup process you will be given the choice to:
  • Install the AntiVirus as a standalone
  • Install the Firewall as a standalone
  • Install both Firewall and AntiVirus

Microsoft Security Essentials

[ Download ]
Microsoft Security Essentials provides real-time protection for your home PC that guards against viruses, spyware, and other malicious software.
Microsoft Security Essentials is a free* download from Microsoft that is simple to install, easy to use, and always kept up to date so you can be assured your PC is protected by the latest technology. It�s easy to tell if your PC is secure � when you�re green, you�re good. It�s that simple.
Microsoft Security Essentials runs quietly and efficiently in the background so that you are free to use your Windows-based PC the way you want�without interruptions or long computer wait times.

Panda Cloud Antivirus

[ Download ]
Free Antivirus for Windows 7
The first free antivirus from the cloud
  1. Preactivated version does not require account creation during install
  2. Fix for certain conditions of stuck quick & full scan
  3. Improved cloud-heuristic detection for unknown malware � From HF_2
  4. Improved prevalence algorithms for priorization of new malware � From HF_2
  5. Fix of problems scanning certain files in system directories � From HF_1
  6. Fix for loss of connectivity after malware disinfection involving LSP � From HF_1
  7. Improved cloud-heuristic detection � From HF_1
0

For Manual Update Norton AntiVirus for Windows 2000/XP/Vista/7

Manual Update Norton AntiVirus for Windows 2000/XP/Vista/7Norton Antivirus from Symantec Corporation produces top antivirus like Norton 360 version 4.0, Norton Internet Security 2010, Norton Antivirus 2010, Symantec Endpoint Protection 11.0, Symantec Endpoint Protection Small Business Edition 12.0, Norton SystemWorks, Symantec AntiVirus, Symantec Mail Security, Symantec Web Security, etc.


LiveUpdate

Manual Update Norton AntiVirus for Windows 2000/XP/Vista/7
LiveUpdate obtains program and protection updates for your computer by using your Internet connection.
Program updates are minor improvements to your installed product. These differ from product upgrades, which are newer versions of entire products. Program updates are usually created to extend the operating system or hardware compatibility, adjust a performance issue, or fix program errors. Program updates are released on an as-needed basis.
LiveUpdate automates program update retrieval and installation. It locates and obtains files from an Internet site, installs them, and then deletes the leftover files from your computer.
Protection updates are the files that keep your Symantec products up-to-date with the latest threat protection technology. The protection updates you receive depend on which products are installed on your computer.

Manual Update Norton AntiVirus

Go to Norton Antivirus Definition Download
Manual Update Norton AntiVirus for Windows 2000/XP/Vista/7
You can update these products using definitions shown below as supporting Norton AntiVirus.

Definition v5i32

Supports the following versions of Symantec antivirus software:
  • Norton AntiVirus 2010 for Windows XP/Vista/7
  • Norton Internet Security 2010 for Windows XP/Vista/7
  • Norton AntiVirus 2009 for Windows XP Home/XP Pro/Vista
  • Norton Internet Security 2009 for Windows XP Home/XP Pro/Vista
  • Norton AntiVirus 2008 for Windows XP Home/XP Pro/Vista
  • Norton Internet Security 2008 for Windows XP Home/XP Pro/Vista
  • Norton 360 version 4.0 for Windows XP/Vista/7
  • Norton 360 version 3.0 for Windows XP/Vista
  • Norton 360 version 2.0 for Windows XP/Vista
  • Symantec Endpoint Protection 11.0
  • Symantec Endpoint Protection Small Business Edition 12.0

Definition i32

Supports the following versions of Symantec antivirus software:
..
  • Norton AntiVirus 2005 for Windows 2000/XP Home/XP Pro
  • Norton AntiVirus 2006 for Windows 2000/XP Home/XP Pro
  • Norton AntiVirus 2007 for Windows XP Home/XP Pro/Vista
  • Norton 360 version 1.0 for Windows XP/Vista
  • Norton SystemWorks (all versions)
  • Symantec AntiVirus 3.0 for CacheFlow Security Gateway
  • Symantec AntiVirus 3.0 for Inktomi Traffic Edge
  • Symantec AntiVirus 3.0 for NetApp Filer/NetCache
  • Symantec AntiVirus 10.0 Corporate Edition Client
  • Symantec AntiVirus 10.1 Corporate Edition Client
  • Symantec AntiVirus 10.2 Corporate Edition Client
  • Symantec Mail Security for Domino v 5.x
  • Symantec Mail Security for Domino v 7.x
  • Symantec Mail Security for Domino v 8.0.x (32-bit)
  • Symantec Mail Security for Microsoft Exchange v 5.x

Definition x86

Supports the following versions of Symantec antivirus software:
  • Norton AntiVirus 2005 for Windows 2000/XP Home/XP Pro
  • Norton AntiVirus 2006 for Windows 2000/XP Home/XP Pro
  • Norton AntiVirus 2007 for Windows XP Home/XP Pro/Vista
  • Norton 360 version 1.0 for Windows XP/Vista
  • Symantec AntiVirus 3.0 CacheFlow Security Gateway
  • Symantec AntiVirus 3.0 for Inktomi Traffic Edge
  • Symantec AntiVirus 3.0 for NetApp Filer/NetCache
  • Symantec AntiVirus 10.0 Corporate Edition Client
  • Symantec AntiVirus 10.1 Corporate Edition Client
  • Symantec AntiVirus 10.2 Corporate Edition Client
  • Symantec AntiVirus for Bluecoat Security Gateway for Windows 2000 Server/2003 Server
  • Symantec AntiVirus for Clearswift MIMESweeper for Windows 2000 Server/2003 Server
  • Symantec AntiVirus for Microsoft ISA Server for Windows 2000 Server/2003 Server
  • Symantec Mail Security for Domino v 5.x
  • Symantec Mail Security for Domino v 7.x
  • Symantec Mail Security for Domino v 8.0.x (32-bit)
  • Symantec Mail Security for Microsoft Exchange v 5.x
  • Symantec Mail Security for SMTP v 5.x
  • Symantec Web Security 3.0 for Windows
  • Symantec AntiVirus Scan Engine for Windows

64-bit Platforms

Definition v5i64

Supports the following versions of Symantec antivirus software:
  • Norton AntiVirus 2010 for Windows XP/Vista/7 for 64-bit OS only
  • Norton Internet Security 2010 for Windows XP/Vista/7 for 64-bit OS only
  • Norton AntiVirus 2009 for Windows XP/Vista for 64-bit OS only
  • Norton Internet Security 2009 for Windows XP/Vista for 64-bit OS only
  • Norton AntiVirus 2008 for Windows XP/Vista for 64-bit OS only
  • Norton Internet Security 2008 for Windows XP/Vista for 64-bit OS only
  • Norton 360 version 4.0 for Windows XP/Vista/7 for 64-bit OS only
  • Norton 360 version 3.0 for Windows XP/Vista for 64-bit OS only
  • Norton 360 version 2.0 for Windows XP/Vista for 64-bit OS only
  • Symantec Endpoint Protection 11.0 for 64-bit OS only
  • Symantec Endpoint Protection Small Business Edition 12.0 for 64-bit OS only
  • Symantec Mail Security for Domino v 8.0.5 for 64-bit OS only

Definition i64

Supports the following versions of Symantec antivirus software:
  • Symantec AntiVirus 10.0 Corporate Edition Client for 64-bit OS only
  • Symantec AntiVirus 10.1 Corporate Edition Client for 64-bit OS only
  • Symantec AntiVirus 10.2 Corporate Edition Client for 64-bit OS only
  • Norton AntiVirus 2007 for Windows Vista 64-bit OS only
  • Norton Internet Security 2007 for Windows Vista 64-bit OS only
  • Norton 360 version 1.0 for Windows XP/Vista 64-bit OS only
Source: Ariefew
0

Tutorial Cara Menghilangkan Virus Worm / VBS

Rabu, 16 Februari 2011


Kalau kita membahas tentang virus / worm, memang tidak ada habisnya. Tapi disini kubahas secara umum saja cara menjinakkan virus / worm vbs dan virus / worm yang menggunakan pemrograman visual basic.
Posting ini saya tulis sebab aku menemukan virus lokal yang biasa disebut virus yuyun atau virus shortcuts, virus ini akan membuat shortcuts seperti folder kita. Untuk penyebarannya virus ini akan membuat file autorun.inf di semua folder. Selain itu, dia akan men disable antivirus, regedit, task manger bankan untuk install dan runningantivirus atau file yang mengandung kata *av* tidak bisa.
Aku akan membahas secara umum saja, cara mengatasi virus-virus yang sejenis dengan ini. Karena akan terus bermunculan virus-virus lain yang menggunakan vbs / visual basic.
Caranya :
..
  • Matikan virus dan program yg menggunakan vbs, anda bisa menggunakan killvb
  • Rename file %SystemRoot%\system32\msvbvm50.dll menjadi msvbvm5.dlldan %SystemRoot%\system32\msvbvm60.dll menjadi msvbvm6.dll (nanti bisa dikembalikan lagi)
  • Gunakan Autoruns atau Process Explorer atau CurrProcess atau HijackThis atau lainnya yang cocok untuk pembersihan register lebih lanjut
  • Matikan System Restore Windows
  • Restart computer (bila perlu pakai safe mode)
  • Pakai antivirus lokal seperti pcmavsmadavansav dan rename file dan folderantivirus tersebut supaya tidak ada kata-kata �av�, misal ansav menjadi 4ns4v. Saya menganjurkan pakai ansav karena ada fasilitas Ansav Registy FX yang akan mengembalikan semua register yang di blok oleh virus.
  • Check dengan killvb lagi apa ada program vbs yang masih jalan
  • Buka Explorer dan Folder Option beri centang pada �Show hidden files and folders� dan  �Hide protected operating system files (Recommended)�
  • Jika tidak bisa, lakukan dengan menggunakan Ansav Registy FX � Check All danRestart Explorer.
  • Scan pakai antivirus
  • Jika belum bersih lakukan pembersihan secara manual sesuai karasteristik virus yang bersangkutan. Untuk virus yuyun, anda bisa menghapus semua file *.db yang mencurigakan terutama file thums.db / thumb.db. Hapus semua file autorun.inf
  • Hapus juga semua file di Recycle Bin dan temperory file
Source: ariefew

SELAMAT MENCOBA ..
0

Cara Mengatasi Flashdisk Yang Terkena Virus


Makin meningkatnya penggunaan flash disk, membuat pembuat virus mengalihkan sasarannya ke media penyimpanan yang simple tersebut, bukan hanya menanamkan virus tetapi juga efek yang dihasilkan beraneka ragam, salah satunya isi yang ada di flash disk, seperti file atau folder disembunyikan (Hidden).
Gimana cara menanggulangi kasus tersebut? , coba ikuti langkah-langkah di bawah ini :
Menghilangkan virus
Langkah Pertama
1.Pastikan antivirus terupdate
2.Masukkan flash disk ke PC atau Laptop
3.Jangan membuka kotak dialog yang muncul ketika flash disk dimasukkan ke PC atau laptop.
Langkah kedua
1.Buka windows Explorer atau My Computer
2.Klik kanan mouse di posisi drive flash disk,biasanya F:
3.Kemudian pilih scan virus sesuai anti virus yang digunakan
(�ingat�, biasakan antivirus terupdate)
Mengembalikan data
Setelah virus benar-benar hilang dari flash disk, sekarang saatnya mengembalikan data yang disembunyikan (Hidden). Berikut langkah-langkahnya:
1.Buka Command Prompt, bisa dengan cara klik Start � Run- ketik cmd atau command (untuk Windows 98/ME).
2.Setelah terbuka jendela command prompt,kemudian ketik attrib -h -r -s -a /s /d f:
(dengan catatan berada di drive C, sebagai contoh; C:\Documents and Settings\test> attrib -h -r -s -a /s /d f: )
3.Lalu setelah perintah tersebut diketikkan,kemudian enter.
4.Apabila langkah no.2 tidak berhasil, anda pindahkan posisinya dari drive C ke drive flash disk (biasanya F), untuk memindahkan posisi drive, ikuti langkah berikut, apabila posisi flash disk di komputer atau laptop ada di drive F, maka (sebagai contoh);C:\Documents and Settings\test> F: kemudian enter maka akan pindah ke drive F:\>
5.Setelah berada di posisi drive flash disk kemudian ketik perintah yang sama dengan langkah no.2, namun untuk f: yang berada di belakang dihilangkan, sebagai contoh :
F:\> attrib -h -r -s -a /s /d , kemudian enter.
6.Sesudah proses tersebut, sekarang coba cek folder atau file yang ada di flash disk.

Selamat Mencoba ..
0

Cara Menyembunyikan Folder Dengan SUPER HIDDEN

Menyembunyikan suatu folder atau file adalah hal yang sangat mudah, Toh cuma klik kanan > Properties > Pada Attributes cek pada Hidden deh� ini memang bisa membuat file/folder kita menjadi tidak terlihat, namun hanya tidak terlihat saja, File/folder ini masih kita bisa temukan. So bagaimana membuat file tersembunyi dan sulit ditemukan, bahkan tidak bisa..
Cekidot :
Langsung aja kita praktek lah� Contoh saya mau menyembunyikan file kidzoom di drive C supaya gag sulit.

        Capture Selanjutnya :


  • Buka CMD kalian


  • Kemudian tuliskan  attrib +s +h c:\kidzoom kidzoom


  • KLik ENTER
    Jangan lupa untuk mengganti c:\kidzoom dengan lokasi folder kalian. dengan format seperti berikut �[[Drive:][Path] FileName]�
    Kalau mau lebih jelasnya lihat Parameters-nya dari Microfost sendiri
    Syntax
    attrib [{+r|-r}] [{+a|-a}] [{+s|-s}] [{+h|-h}] [[Drive:][Path] FileName] [/s[/d]]
    Parameters
    +r : Sets the read-only file attribute.
    -r : Clears the read-only file attribute.
    +a : Sets the archive file attribute.
    -a : Clears the archive file attribute.
    +s : Sets the system file attribute.
    -s : Clears the system file attribute.
    +h : Sets the hidden file attribute.
    -h : Clears the hidden file attribute.
    [Drive:][Path] FileName : Specifies the location and name of the directory, file, or set of files for which you want to display or change attributes. You can use wildcard characters (that is, ? and *) in the FileName parameter to display or change the attributes for a group of files.
    /s : Applies attrib and any command-line options to matching files in the current directory and all of its subdirectories.
    /d : Applies attrib and any command-line options to directories.
    /? : Displays help at the command prompt.
       
    Yang diatas sih cuma buat tambahan aja� Jangan lupa, inget lokasi folder super hidden kalian.


  • Source: Kidzoom


    0

    Cara Membuat Symbol Menggunakan Fungsi Tombol ALT


    Sedikit Berbagi Meskipun Terlambat, hehe,,
    Langsung aja Cekidot ..

    Copyright (�) Alt, 0, 1, 6, 9
    Trademark ( � ) Alt, 0, 1, 5, 3
    Registered (�) Alt, 0, 1, 7, 4
    Bullet ( � ) Alt, 0, 1, 4, 9
    Ellipsis (�) Alt, 0, 1, 3, 3
    �EN� Dash ( � ) Alt, 0, 1, 5, 0
    �EM� Dash ( � ) Alt, 0, 1, 5, 1
    Paragraph (Pilcrow) ( � ) Alt, 0, 1, 8, 2
    Pound (�) Alt 0, 1, 6, 3
    Euro ( � ) Alt, 0, 1, 2, 8
    Cents (�) Alt, 0, 1, 6, 2
    One-half (�) Alt, 0, 1, 8, 9
    French accent (�) Alt, 0, 2, 2, 4
    French accent (�) Alt, 0, 2, 3, 1
    French accent (�) Alt, 0, 2, 3, 2
    French accent (�) Alt, 0, 2, 3, 3
    French accent (�) Alt, 0, 2, 3, 4
    German accent (�) Alt, 0, 2, 5, 2
    Spanish accent (�) Alt, 0, 2, 4, 1
    � � 0191
    � � 0192
    � � 0193
    � � 0194
    � � 0195
    � � 0196
    � � 0197
    � � 0198
    � � 0199
    � � 0200
    � � 0201
    � � 0202
    � � 0203
    � � 0204
    � � 0205
    � � 0206
    � � 0207
    � � 0208
    � � 0209
    � � 0210
    � � 0211
    � � 0212
    � � 0213
    � � 0214
    � � 0216
    � � 0217
    � � 0218
    � � 0219
    � � 0220
    � � 0221
    � � 0222
    � � 0223
    � � 0224
    � � 0225
    � � 0226
    � � 0227
    � � 0228
    � � 0229
    � � 0230
    � � 0231
    � � 0232
    � � 0233
    � � 0234
    � � 0235
    � � 0236
    � � 0237
    � � 0238
    � � 0239
    � � 0240
    � � 0241
    � � 0242
    � � 0243
    � � 0244
    � � 0245
    � � 0246
    � � 0249
    � � 0250
    � � 0251
    � � 0252
    � � 0253
    � � 0254
    � � 0255
    **PS: buat yang aksen german, perancis dan spanyol sengaja ga� gw tulis alt nya. Tapi penggunaannya tetep pake alt.
    ? (Smiley Face) Alt,1
    ? (Smiley Face black vers) Alt,2
    ? (Heart) Alt,3
    ? (Diamond) Alt,4
    ? (Club) Alt,5
    ? (Spade) Alt,6
    � (Bullet) Alt,7
    ? (Bullet) Alt,8
    ? (Music Notes) Alt, 1, 4
    � (Sun) Alt, 1, 5
    (Arrow) Alt, 23-29
    (Greek Alphabet) Alt, 224-238
    (Math Symbol) Alt, 240-253


    Note:
    #Kalo anda punya yg lain silahkan menambahkan di kolom komentar, terima kasih.
    0

    Cara Mengganti Nama Prosesor Pada PC


    Pada postingan kali ini akan saya berbagi cara untuk mengubah nama processor komputer, misalnya dari Intel� Pentium� III Processor menjadi Intel Core i7-975 Extreme. Berikut caranya.
    * Buka registry Anda, dengan mengklik [Start].
    * Pilih [Run].
    * Ketikkan [Regedit], klik [Ok].
    * Setelah registry terbuka, masukklah ke sub key: [HKEY_LOCAL_MACHINE\HARDWARE\DESCRIPTION\System\CentralProcessor] atau [HKEY_LOCAL_MACHINE\HARDWARE\DESCRIPTION\System\CentralProcessor\1], yang manapun juga bisa.
    * Setelah Anda masuk ke sub key tersebut carilah [ProcessorNameString].
    * Setelah Anda temukan silahkan double klik.
    * Maka akan terbuka jendela [Edit String].
    * Pada [Value Data] masukkanlah nama processor yang Anda inginkan.
    * Setelah selesai klik [Ok] dan Tutup jendela registry Anda.
    Untuk melihat hasilnya, klik kanan pada icon [My Computer], setelah itu klik [Properties]. Anda akan melihat nama processor Anda telah berubah pada tab [General] bagian [Computer]. Namun manipulasi ini hanya bisa dilihat di properties My Computer dan tidak bisa dilihat di menu [Run] >> [dxdiag].
    0

    Cara Mudah Mengalahkan NETCUT

    Menggunakan FREE HOTSPOT Memang mengasyikkan apalagi kalo koneksinya super cepat hehe.. mantabb, lain halnya kalo koneksinya lemotz anda kan melakukan segala cara demi koneksi yang wuzz seperti menggunkan NETCUT, kalo anda yang menggunakan NETCUT emang enak, tapi log jadi korban?? pasti gondoxx N sebell setengah mati.
    Yupz, seperti judul diatas pada postingan kali ini saya ingin berbagi sedikit cara tentang menanggulangi NETCUT, Cekidot >>

    CARA 1 :

    Gunakanlah ANTI NETCUT. Software free ini merupakan sebuah terobosan awal untuk menanggulangi NETCUT. Sahabat dapat mendownloadnya secara gratis di Brothersoft.com atau silakan sahabat bertanya pada Mbah Google. Namun sayangnya, cara ini kurang efektif. Mengapa..? Author dari NETCUT sendiri juga tidak mau kalah untuk mengembangkan productnya ini, jadi secara singkatnya : NETCUT selalu berada di depan ANTI NETCUT.

    CARA 2 :
    Karena ANTI NETCUT memiliki banyak kekurangan untuk mengatasi masalah ini, saya akan berikan sebuah cara lagi, yaitu menggunakan Address Resolutin Protocol. Apa lagi itu...? Address Resolution Protocl (arp) adalah sebuah protokol internal dalam windows untuk mengecek addres protocol IP sahabat. Saya tidak akan membahas lebih lanjut tentang arp ini, saya hanya akan memberi petunjuk cara menggunakannya demi untuk mengantisipasi NETCUT ini. Cara mengaktifkan arp sendiri bisa sahabat praktekan melalui comand prompt, kemudian ketik arp �a
    C:\Documents and Settings\user>arp -a
    Interface: 192.168.0.245 --- 0x2
    Internet Address.......Physical Address....... Type
    192.168.0.1............00-1c-c0-b5-a5-db..... dynamic
    192.168.0.254.........00-0c-42-5b-eb-79......dynamic
    catat semua yg ada baik IP dan mac address
    setelah ini lakukan perintah serta input IP dan MAC yg telah dicatat tadi melalui TMAC, silahkan download TMAC ini lewat brothersoft.com
    Perlu menjadi catatan, cara ARP ini hanya akan berhasil jika sahabat yakin bahwa di daerah tersebut belum ada NetCut yang aktif dan belum ada virus ARP.


    CARA 3 :
    Cara yang satu ini lebih rumit namun lebih banyak keberhasilannnya dari 2 cara yang lain. Begini, jika para pengguna NETCUT terseut berbuat curang, maka anggaplah jika kita mencurangi mereka gantian, itu dapat dianggap impas..!! Lho, apa hubungannya...? Hmmmm, cara yang ketiga ini juga akan memaksa kita berbuat curang. Caranya...?
    Silahkan sahabat siapkan 2 alat ini : Ipscan dan TMAC (anda dapat mendownloadnya secara gratis di brothersoft.com, atau silahkan bergoogling ria)
    Aktifkan Ipscan. Dalam kotak IP range isikan 127.0.1 to 127.0.225 (maksimal). Nah, akan ditunjukkan semua IP yang sedang aktif dalam network tersebut. Disini berarti jika semua IP tidak aktif dan hanya ada satu IP yang aktif, tidak diragukan lagi ahwa pemilik IP tersebut menggunakan NETCUT. Klik IP yang online tersebut, kemudian show mac addres. Catat mac milik IP tersebut.
    Kemudian rubahlah mac IP sahabat menggunakan TMAC persis seperti mac addres IP yang baru saja sahabat catat tersebut. Secara tidak langsung, sahabat telah membuat mirror IP pada IP tersebut, jadi mau tidak mau pengguna IP addres tersebut akan berbagi koneksinya dengan anda...

    Selamat Mencoba ..